P23993 Design for Quality Assignment Answers
Academic Year 2020/21
P23993 – Design for Quality
Question 1
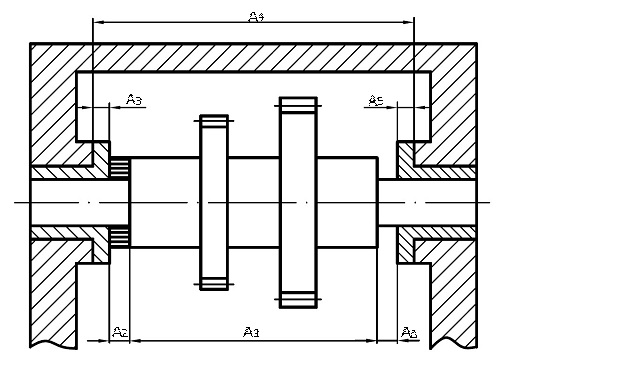
Consider a tolerance chain given in Figure Q1 with dimensions shown in Table Q1.

Figure Q1
Table Q1
|
Last digit of the student number upxxxxxX | ||||||||||
|
1 |
2 |
3 |
4 |
5 |
6 |
7 |
8 |
9 |
0 | |
|
A1 |
138 |
136 |
134 |
151 |
152 |
149 |
147 |
143 |
128 |
119 |
|
A2 |
2 |
4 |
4 |
3 |
3 |
2 |
3 |
2 |
3 |
2 |
|
A3 |
5-0.12 |
5-0.12 |
6-0.12 |
4.5-0.12 |
5-0.12 |
4-0.12 |
5-0.12 |
5-0.12 |
4-0.12 |
4-0.12 |
|
A4 |
151 |
151 |
151 |
164 |
166 |
160 |
161 |
156 |
140 |
130 |
|
A5 |
5-0.12 |
5-0.12 |
6-0.12 |
4.5-0.12 |
5-0.12 |
4-0.12 |
5-0.12 |
5-0.12 |
4-0.12 |
4-0.12 |
|
AΔ |
1+0.7 | |||||||||
1. Allocate tolerances using Worst Case – Average Tolerance Grade Method [20 marks]
2. Allocate tolerances using RSS method [13 marks]
Question 2 – Selective Assembly
A company intending to produce components for a fit with guaranteed clearance / interference as given in Table Q2 (Jmin, Jmax or Smin, Smax respectively). It has been experiencing problems when machining both holes and shafts caused by lack of process capability, see Manufacturing Methods in Table Q2. Maintaining fit characteristics transform the tolerances to suit company's capability implementing selective assembly method.
Table Q2
|
Second from the last digit of the student number upxxxxXx |
Nominal size, mm |
Manufacturing method |
Fit requirements |
System | ||||
|
Hole |
Shaft |
Clearance |
Interference | |||||
|
Jmin |
Jmax |
Smin |
Smax | |||||
|
0 |
Ø26 |
Drilling (IT13) |
Rough Turning (IT12) |
70 |
260 |
42 |
272 |
Hole |
|
1 |
Ø15 |
Reaming (IT8) |
Precision Turning (IT7) |
30 |
48 |
37 |
53 |
Shaft |
|
2 |
Ø40 |
Rough Broaching (IT10) |
Rough Turning (IT11) |
90 |
190 |
24 |
136 |
Hole |
|
3 |
Ø8 |
Honing (IT5) |
Lapping (IT6) |
2 |
7 |
3 |
9 |
Shaft |
|
4 |
Ø30 |
Boring (IT9) |
Turning (IT8) |
30 |
73 |
34 |
74 |
Hole |
|
5 |
Ø64 |
Milling (IT10) |
Precision Turning (IT7) |
55 |
135 |
72 |
147 |
Shaft |
|
6 |
Ø12 |
Diamond Boring (IT6) |
Precision Turning (IT7) |
58 |
72 |
48 |
59 |
Hole |
|
7 |
Ø10 |
Broaching (IT8) |
Turning (IT9) |
42 |
69 |
54 |
77 |
Shaft |
|
8 |
Ø25 |
Honing (IT8) |
Polishing (IT7) |
35 |
59 |
33 |
54 |
Hole |
|
9 |
Ø20 |
Drilling (IT11) |
Rough Turning (IT10) |
3 |
83 |
47 |
147 |
Shaft |
- Determine tolerances of the mating parts based on the manufacturing methods [4 marks]
- Calculate the number of groups [4 marks]
- Calculate upper and lower limit deviations for the hole and the shaft [8 marks]
- Draft the tolerances, indicating the groups [8 marks]
- Calculate maximum and minimum interference / clearance for each group [10 marks] Question 3 – Quality control
You are employed as a quality engineer and you have been asked to help in designing a limit gauge for quality control of machined shafts. Your company quality policy requires prevention of acceptance of any defective parts.
a. Using the appropriate approach allocate the tolerances for ‘GO’ and ‘NOT-GO’ ends of a snap gauge for controlling diameter of a shaft ØAB . Support your answer with all relevant tolerance diagrams.
Table Q3
|
Third from the last digit of the student number upxxxXxx |
Shaft diameter ØA, mm |
Tolerance B |
|
1 |
10 |
h10 |
|
2 |
20 |
h9 |
|
3 |
30 |
h8 |
|
4 |
40 |
h7 |
|
5 |
50 |
h6 |
|
6 |
60 |
h10 |
|
7 |
70 |
h9 |
|
8 |
80 |
h8 |
|
9 |
90 |
h7 |
|
0 |
100 |
h6 |
[20 marks]
b. Using the diagram from part (a) showing the allocation of Limit Gauge tolerances, give an example of a situation where a shaft with a particular actual dimension is made in the tolerance, but when inspected by this Limit Gauge (worn, but still within the gauge tolerance), might be misjudged as bad. Plot it on the tolerance diagram. [13 marks]
Resources
- 24 x 7 Availability.
- Trained and Certified Experts.
- Deadline Guaranteed.
- Plagiarism Free.
- Privacy Guaranteed.
- Free download.
- Online help for all project.
- Homework Help Services

