Network Analysis
Introduction
In this week, you will be running some simple network analysis processes to examine the catchment area of the Mt Eden train station from a number of perspectives including walkability, cycle commuting and transit connectivity. These – cycling proximity, walkability, transit connectivity – are determinants of the accessibility of the train station. Getting more individuals commuting by public transit is an ongoing initiative of Auckland Transport and Auckland Council. It is environmentally more sustainable, cost effective (depending on distance traveled and passenger per vehicle), and reduces motor vehicle traffic on Auckland’s seemingly always-already congested roads. Rail in particular has the added advantage over buses in that it constitutes its own dedicated route of travel separate from the motorway, which means that once individuals get on a train, they are on a mode of direct transportation in which they do not need to compete with other vehicles (i.e., unlike on a bus, you won’t be stuck in traffic once on a train). With the presence of the Britomart, for example, commuting to work by train represents an efficient and direct means of traveling into and out of Auckland’s central business district.
In their study of the distances that people are willing/likely to walk to public transport in
Brisbane, Australia, Burke & Brown (2007) determined the following:
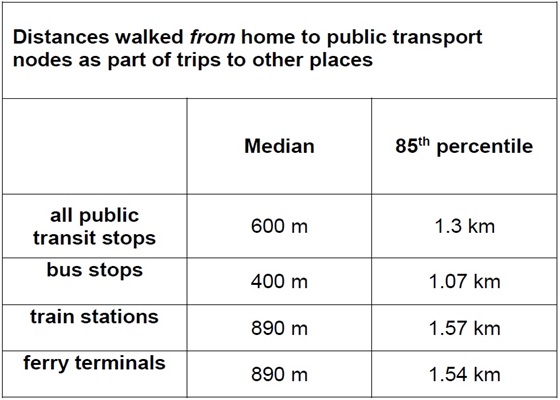
Burke M & Brown AL (2007) Distances people walk for transport. Road & Transport Research: A Journal of Australian and New Zealand Research and Practice 16(3): 16-29.
And we are going to need these values to answer the questions.
Objectives
By the end of this tutorial, you should be familiar with:
- Thinking like a spatial analyst & spatial problem solving
- Planning and executing complex analysis from initial stages through to completion
- Performing network analysis using networked spatial datasets
Assignment Template
You can download the template for the assignment below. Please answer all the questions and paste all the produced maps from ArcGIS into the document.
Please save the document as a PDF before submitting.
Good luck!
Resources
In this network analysis section, you will be working with the following resources. They are provided in a file geodatabase, which is like a container to store your vector GIS files:
- A GISci242_lab3.mxd file with some preliminary symbology for some of the layers you will be working with. For the most part, the colours chosen have at this point been set to make features distinguishable from one another; you are free to alter the display symbology. Once you have launched FlexIT, got to 'File', 'Open' and navigate to your lab 3 folder to open this mxd. This is prefereable to adding the data manually.
- A network folder containing a road network geodatabase for all of New Zealand (CoraxStreet.gdb) from 2014. This folder also contains a pdf manual for the network dataset. Here, the actual network topology is represented by the roadnet_NDnetwork dataset (this is separate from the centerline layer displayed by hierarchy).
Note: These datasets are provided for use in this lab, and are not to be used for any commercial or other purposes.
- A file geodatabase containing the additional feature classes you will need to complete the lab assignment:
- Train_Stations, AT_Rail (line), AT_AKL_Bus_Routes, AKL_Cycle_Network (not a network layer; simply linear features), and AT_AKL_Bus_Stops, all provided by Auckland Transport in 2014 under a Creative Commons license.
- MBs_AKL_2013: The 2013 Meshblocks with population data attached, symbolised according to population density (per km2).
- AKL_Region: A bounding polygon for the Auckland region and nz: a background NZ area boundary file.
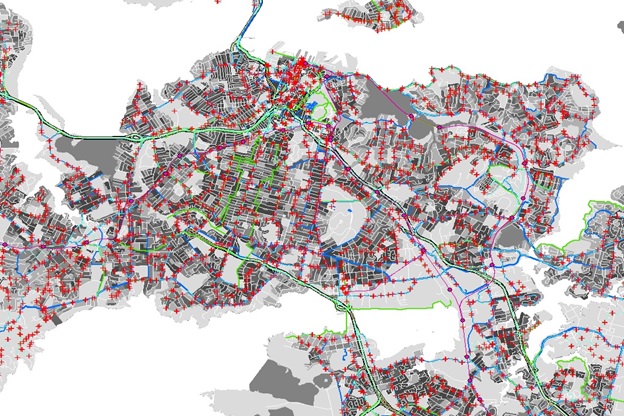
This is a separate backup of the bus routes layer if needed.
Buffer
One of the most basic questions asked of a GIS is "what's near what?" For example:
- How close is this well to a landfill?
- Do any roads pass within 1,000 meters of a stream?
- What is the distance between two locations?
- What is the nearest or farthest feature from something?
- What is the distance between each feature in a layer and the features in another layer?
- What is the shortest street network route from some location to another?
The Proximity toolset contains tools that are used to determine the proximity of features within one or more feature classes or between two feature classes. These tools can identify features that are closest to one another or calculate the distances between or around them.
Buffer is one of the most important proximity tools and it creates buffer polygons around input features to a specified distance.
For more info on how to use the Buffer tool head back to the pre-lab instructions, or learn more about how Buffer works.
For example, we can use buffer to see how many bus stops are within 500 meters of a train station, to decide a transfer.
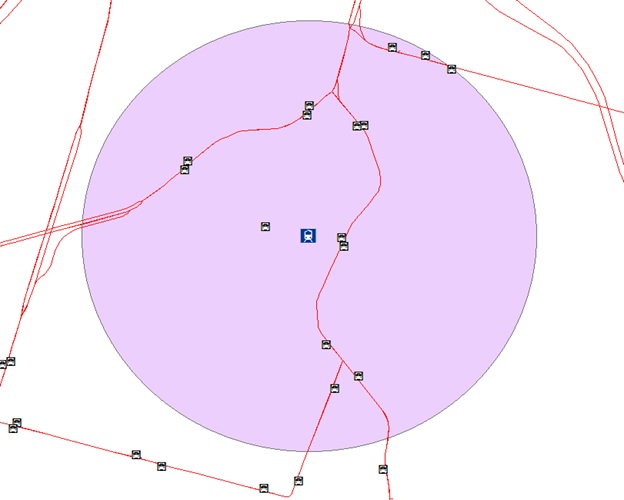
The buffer can also be used a quick and easy way to find features within a certain distance of the input, by combining this with another analysis.
We want to know how many people are within the walking distance of Mt Eden Train Station, so after building the buffer layer we can use several different tools to find the answer that I will show you here.
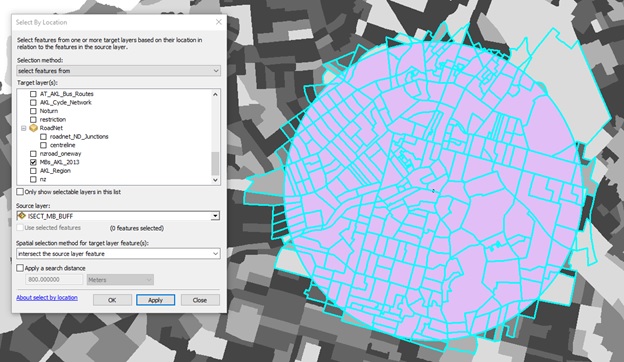
Buffer & Select by Location
This is the quickest a simplest method of finding the population within the buffer (in fact we don't necessarily need to have created the buffer layer to use this)
- Head to the 'Selection' tab, and choose 'Select By Location'
- Keep 'select features from' as the 'Selection method'
- Select 'MBs_AKL_2013' as the 'Target layer'
- Set your Mt Eden Train Station buffer as the 'Source layer'
- For the 'Spatial selection method ...' in this case we want to use 'intersects the source layer feature' as we want to find any meshblocks that are completely or partially within the buffer. Have a look at the other selection methods, and think what you might use them for.
- Hit 'OK', and you will see the meshblocks selected.
- Open the Attribute table for the meshblocks, and click the 'Show selected records' button at the bottom of the window
- Next, right-click on the column heading for 'Pop_2013' (the 2013 population count) and click 'Statistics'
- The window that opens up shows you the statistics for the data, including the sum which is the population of all of the selected meshblocks
- You will also need to do the same step on all of the meshblocks to find the total Auckland population in 2013.
- Once you have finished, clear the selection using the 'Clear Selected Features' button on the main toolbar.
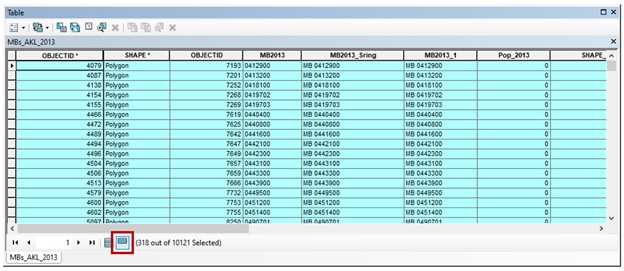
It is good practice to always clear a selection as soon as you are done with it, as this may mess up the next analysis you do.
Simple Select by Location
You can also select by location without needing to create the buffer.
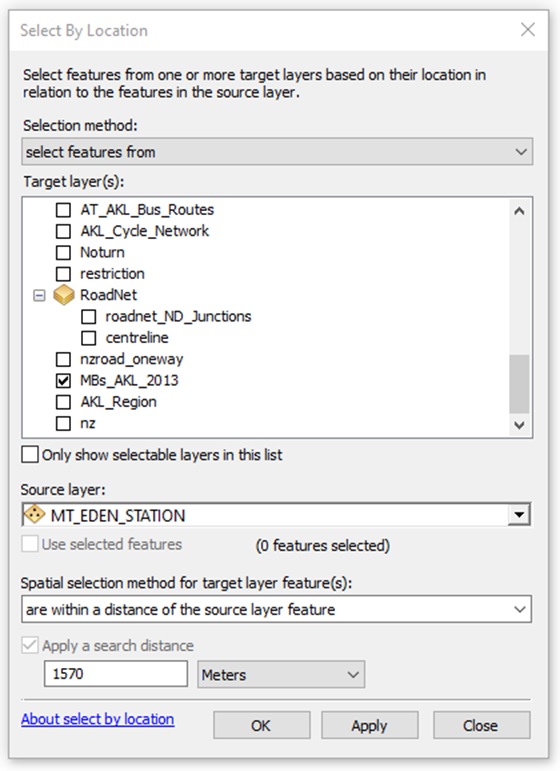
- Clear any current selections, the open the 'Select By Location' window
- Choose the meshblocks as the Target layer, and your Mt Eden train station point as the Source layer.
- For the 'Spatial selection method ...' specify 'are within a distance of the source layer feature' and enter the walking distance in the box below
- Hit 'OK', and you will see the features selected
- Then follow the same instructions above to find the population sum for these meshblocks
Intersect
The next option is the Intersect tool. This creates a new layer that contains only the features you are after. Learn more here.
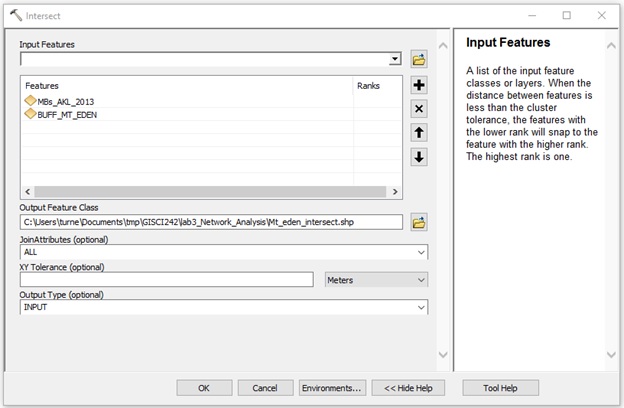
- Head to the 'Geoprocessing' tab, and choose 'Intersect'
- Use the drop-down to add 'MBs_AKL_2013' and your buffer as the two inputs
- Save the layer in your H: Drive, and hit 'OK'
- This creates a new layer containing the meshblocks that intersect the buffer polygon.
- You would then find the population of these meshblocks using the same method desribed above. Note that you would not need to filter by selected records in the Attribute table, as this layer only contains meshblocks within the buffer area.
All of the above mehtods produce the same (or similar result). Which one you choose depends on the work you are doing, and personal preference.
Now that you are an expert in all things location analysis, choose a method, and answer question 1.
Question 1
What percentage of the total Auckland population, to two (2) decimal places, is potentially served by the Mt Eden train station? Use the 85th percentile distance which people are willing to walk to a train station (Burke and Brown, 2007) on the introduction tab.
Detail step-by-step the procedure you used to determine the estimate (point form or numbered response is acceptable). Then, briefly explain the limitation(s) of using the approach/methodology you outlined.
Network Analysis
As a first step, ensure that the Network Analyst extension is enabled (Customize on the main toolbar > Extensions > make sure the box next to Network Analyst is checked).
You can access most Network Analyst functions via the Network Analyst Tools toolbox under ArcToolbox, but you can also add theNetwork Analyst Toolbar (Customize > Toolbars > Network Analyst).

Clicking on the

Network Analyst Window icon will open a separate window that contains all your network analyst ‘work’, and helps organize your network analysis operations and layers. You can ‘dock’ this window as part of the ArcGIS interface (move it into one of the blue arrows that appear either along the top, bottom, or right/left sides of your screen to place it in that location). (Note:This may not be possible using ArcMap in FlexIT - just move the window to the side of your screen).

Usually, when a network data (e.g., road network) has been added, you must build it by clicking on the ‘Build Network Dataset’ icon. However, in this case, the network has already been built (the roadnet_ND layer that appears in the dropdown of available network datasets).

You can add new network analysis layers (i.e., new network analysis ‘problems’) either through Toolbox or via the Network Analyst dropdown on the far left of the Network Analyst toolbar. If you choose to add a new ‘Vehicle Routing Problem', for example, this will add a new layer to your table of contents, as well as new items to your Network Analyst window (with 0’s in brackets next to these as you haven’t specified any network locations yet). Once you have specified all of your inputs (defined the problem), you can ‘Solve’ the network problem by clicking the ‘Solve’ icon on the Network Analyst toolbar.
Service Area
With the ArcGIS Network Analyst extension, you can find service areas around any location on a network. A network service area is a region that encompasses all accessible streets (that is, streets that are within a specified impedance). For instance, the 5-minute service area for a point on a network includes all the streets that can be reached within five minutes from that point. Service areas created by Network Analyst also help evaluate accessibility. Concentric service areas show how accessibility varies with impedance. Once service areas are created, you can use them to identify how much land, how many people, or how much of anything else is within the neighborhood or region (ArcGIS Desktop Documentation).
Determining the estimated number of people within reasonable walking distance of the Mt Eden train station is a service areaproblem. As such, add a New Service Area via the Network Analyst dropdown on the toolbar. In so doing, you will also see a new, complex multi-element Service Area layer added to your Table of Contents, as per the diagram below.
- This newly-added service area layer displays the colour and symbology scheme associated with the various elements in the network analysis problem, and can be used in the usual way to control symbolization and data export. At this stage, nothing from this layer has actually been added to the map because you have not specified any inputs to the problem – i.e., you have not yet defined the service area problem to be solved. This is evident if you look at the Network Analyst window, where you will see that all of the inputs are empty as designated by ‘(0)’ next to each element (see below).
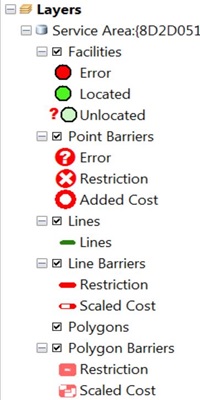
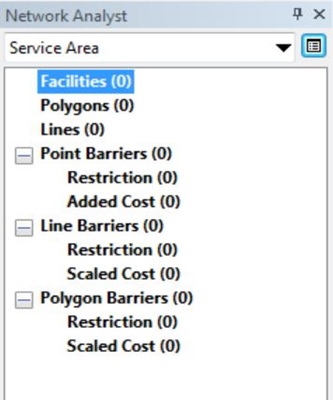
At this stage, Facilities are the input of concern. Right-click on Facilities and select Load Locations. This will open up the Load Locations dialogue (below).
- Before you proceed, however, you will need to isolate the Mt Eden rail station as its own shapefile if you haven’t already done so.
Because this is a simple problem at this stage, you need only load the Mt Eden rail station (either from the Train_Stations layer or loading the train station itself if you have written it to its own layer).
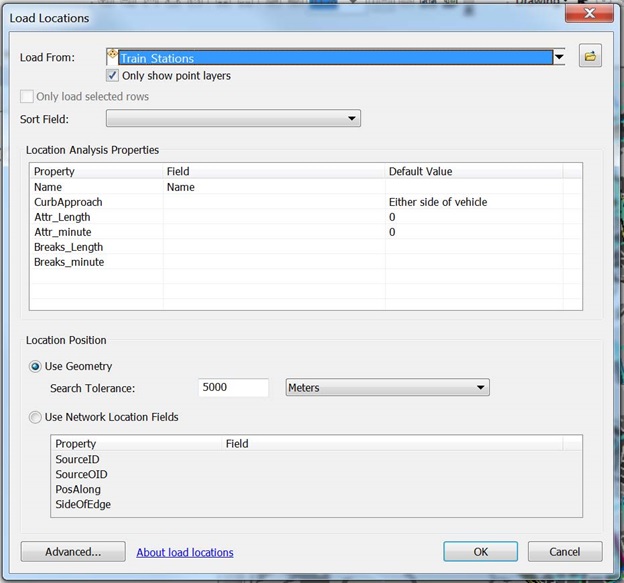
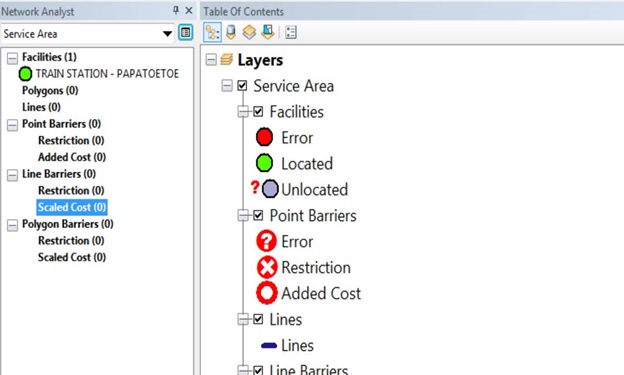
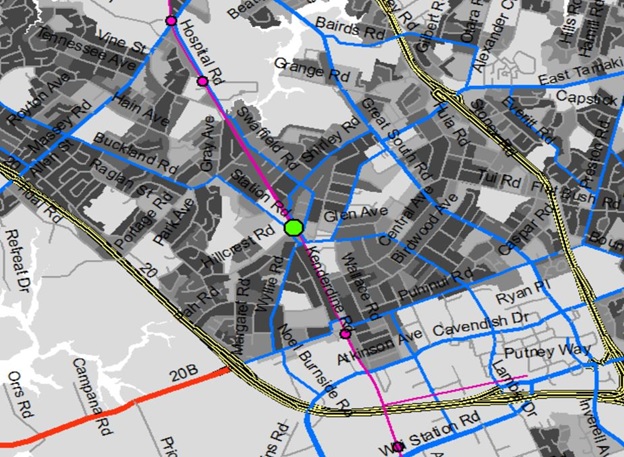
Once you have loaded the Mt Eden train station, as you can see from the screenshot mosaic below, there has been 1 network location added to Facilities; and, as we can tell from the symbology for the Service Area problem layer, it has been ‘located’ on the network (bright green).
Because you want to determine an estimate of the % of the Auckland population within walking distance of the Mt Eden train station, you will want to make sure that these parameters are set correctly. To do so, right click on the Service Area layer to access the layer’s Properties, and openthe Analysis Settings.
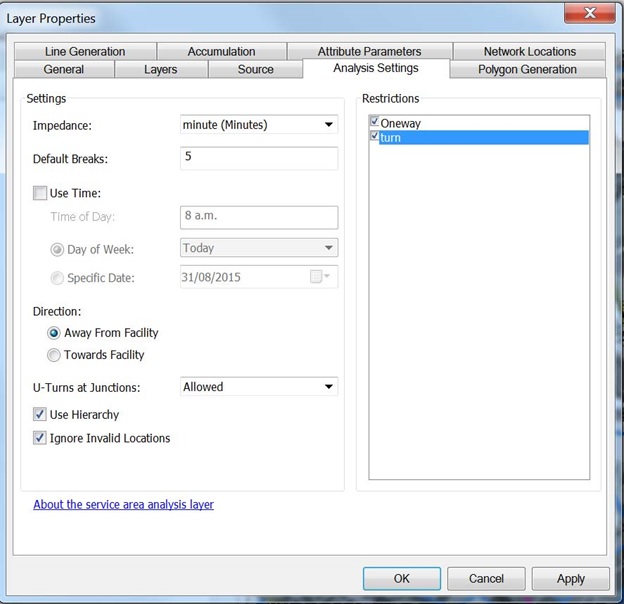
In this scenario, we are not interested in road travel time but rather the distance that someone is willing to walk to a train station. Hence, change the Impedance to 'Length', and specify a single Default Breaks value that is the 85th s% walking distance defined by Burke & Brown (2007). Here you could specify multiple break values/distance bands separated by commas (e.g., ‘1000, 2000, 3000’), but for the intents and purposes of this step, use only the singular distance value.
The direction here is not an issue (distance walking to and from one’s home to the train station is the same). Furthermore, we don’t want to use the road network hierarchy (class of road), so uncheck this option. Restrictions such as one-way streets and turns also don’t apply to walking as opposed to driving, so remove these as analysis parameters as well. Click Apply and Ok, and exit the Layer Properties for the Service Area layer.
Solve the Service Area problem. Your output will be an irregularly shaped polygon that represents all areas on the map within the specified walking distance along the street/road network. You will see that the Polygons element in the Network Analyst window is now populated (demarcated by (1)). Use this to come to an estimation of the % of the Auckland population within walking distance of the Mt Eden train station.
Report this value in response to Question 2 for this assignment.
Question 2
How many people are served by the Mt Eden station when the streets by which people walk to the train station are taken into account? When determining your estimation, specify the spatial relationship as one of intersection.
The following video shows the process of creating a service area:
|
00:00 00:00 1.00x |
Multi-Facility Service Area Problems
We are not there yet! You will notice from the output polygon generated in the previous step that the Grafton rail station, which is the station immediately northeast of Mt Eden, is actually located within the Mt Eden train station service area. We can assume that individuals living closer to the Grafton train station are more likely to walk to that train station rather than Mt Eden. At the same time, we should probably account for the fact that individuals living in the southwest of the Mt Eden catchment (service area) may similarly be closer to the train southwest of Mt Eden, Kingsland. This constitutes a multi-facility service area problem. To determine the population for whom Mt Eden is closest (i.e., for whom Mt Eden is closer than either Grafton or Kingsland), we need to define the problem differently.
- First, add both Grafton and Kingsland as locations to Facilities.
- Next, re-open the Layer Properties for the Service Area layer, and switch over to thePolygon Generation tab. Make sure that Generate Polygons is checked, and you can specify the Polygon Type to be Generalized. Untick trim polygons.
- Think carefully about the settings for both the Multiple Facilities Options and Overlap Type, and determine what these should be. Think about the area you are trying to generate (or isolate) by solving this multiple-facility service area problem: the area that is exclusively served by the Mt Eden train station as a function of it being the nearest railway station within the shortest walking distance where walking distance is minimized between the three train stations within the Mt Eden service catchment, still using the 85th % distance. Once you have determined your settings, take a screenshot of the Polygon Generation tab of the Layer Properties dialogue box and insert it in response to Question 3 of the lab worksheet for this assignment.
- Solve this multi-facility service area problem to generate mutually exclusive (non-competing) service areas for the Mt Eden, Grafton, and Kingsland train stations.
- Obviously, some meshblocks straddle more than one service area. We want to come to an estimation of the number of people served most immediately by the Mt Eden train station – i.e., where this train station is closest to them between Mt Eden & Kingsland in the southwest, and Mt Eden & Grafton northeast along the train line.
- We will assume that if the centroid (geographical centre of gravity) of a meshblock is contained within the non-competing Mt Eden service area, that the majority of that meshblock (in terms of geographical area) is contained within Mt Eden’s catchment, and as such the majority of the people living in that meshblock are closer to Mt Eden than to either Kingsland or Grafton. Granted, we do not know where within any one meshblock people live, and we do not have the information necessary to disaggregate this information (we must assume zonal homogeneity). Nevertheless this is an improvement over a simple spatial relationship of areal containment, which will isolate only those meshblocks completely within the catchment, or intersection, which select all meshblocks where even only a geometrical sliver is within the catchment. As such, you will want to generate centroids for the Meshblocks.
- To generate centroids, use the Feature to Point tool (under Features within the Data Management toolbox. As you will see, these centroids retain all the attribute data of the meshblocks themselves.
- Determine an estimate of the number of persons served by Mt Eden train station over and above neighbouring train stations on the basis of a spatial relationship of centroid containment. Report this value in response to Question 4 on the worksheet for this assignment.
Question 3
Insert (paste) your screenshot of the Polygon Generation settings of the Layer Properties dialogue for the multi-facility service area problem for the Mt Eden train station.
Question 4
What is the number of people served exclusively by the Mt Eden train station, where Mt Eden is the nearest train station within reasonable walking distance (85th %) and where walking distance has been minimized to other nearby train stations (Grafton or Kingsland)?
Finally, create a map to display your final multi-service area as Map 1.
Map 1
Map 1 should show the pedestrian catchment for Mt Eden Train Station. The map should tell the story of where the walkable areas are, why they are there specifically, e.g. using the roads, train station layers etc to add context.
Add the meshblocks layer as the background to the map, and symbolise this by population density (this is already a field in the meshblocks layer).
Rememeber to avoid clutter on the map - roads should be symbolised in a subtle way, and thinks like bus stops, routes or cycle paths should be turned off for Map 1 as they are not relevant.
Advanced Symbology
Map 1 is a great opportunity to explore some of the advanced symbols available in ArcMap for point features.
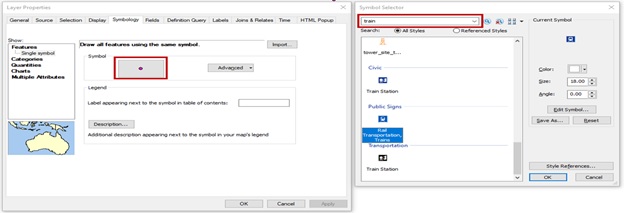
- Right-click on a point layer (e.g. the train stations) and open the 'Properties'. Head to the 'Symbology' tab.
- Click the 'Symbol' patch to open the 'Symbol selector' window.
- Try searching for "train" and scroll through all the different options available
- Have a look at what else is available, e.g. bus stops etc
Labeling
This is also a good time to have a look at labeling. In your maps it makes sense to show all the train stations, or at least those nearby, but Mt Eden needs to stand out as it is the main focus of the analysis. This could be accomplished by making the symbol different, a different color, larger etc.
You can also do this by labeling.
- Open up the 'Properties' of the train stations layer, and head to the 'Labels' tab
- Tick 'Label features in this layer'
- In the 'Label field' drop down select 'STATION' and hit apply.
- You can play around with label placement, the font, size and color etc.
Warning!
Labels are a great way to add context, and they are also a great way to clutter up a map (e.g. if you added a label for each road!). Use then sparingly - do all the train stations need to be labelled, or just the key ones?
|
« PREVIOUS TAB |
Location-Allocation
Location-allocation involves determining which locations (e.g. facilities) from a set of potential locations serve demand for those facilities in ways that minimize impedance (e.g., travel time along a network). More information on location-allocation can be found online.
Here is a simple problem that can be solved through a location-allocation analysis in this study: which of the 50 train stations minimises overall travel from all 5,656 bus stops in the Auckland region? In other words, which of the train stations is a travel-time weighted centre to which travel time from all possible bus stops is lowest?
- Travel time is already encoded onto the network for each road segment. If you open the attribute table for the centrelinelayer in the RoadNet group layer, you will see the ‘minute’ field. Each road/street is ‘broken’ at each and every intersection with any other road segment in the network; travel time is encoded in minutes for each segment on the basis of permitted road speed along the segment.
- Create a new Location-Allocation layer. Load the train stations as Facilities, and bus stops as Demand Points.
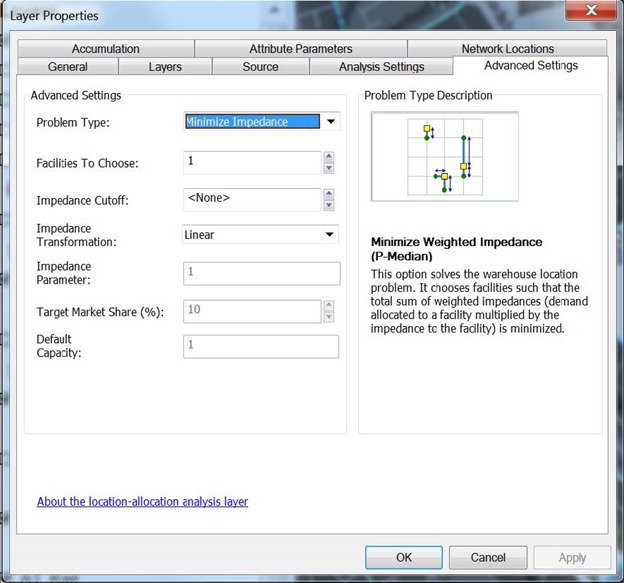
- Open the layer properties for the Location-Allocation layer, and access the Analysis Settings. Specify the impedance to be minutes, and define the location-allocation problem as one of travel from demand points to facilities. Deselect use of the road hierarchy.
- Switch over to the Advanced Settings tab, and accept the defaults as per below: you want to find the one (singular) facility to which travel time in minutes (impedance) is minized. Click OK and Solve the location-allocation problem.
You may get a warning saying not all locations could be allocated. This is OK to ignore - the issue comes from bus stops on Waiheke Island not being connected by road to any train station. Your output will be lines added in the Location-Allocation layer connecting all bus stops to the one facility (train station) to which travel along the network is minimized from all possible demand points (bus stops). Granted, this does not take which portions of the road network are actually served by bus routes into account; however, the bus routes layer is not a network dataset. You could attempt to build one; however, the reason we are using the Corax road network is that building a network dataset is extremely time-consuming in terms of processing time and error-prone (ArcGIS is likely to crash). Hence, this is not an ‘exact’ analysis in this case, but rather a hypothetical one – and an introduction to the tool.
The selected facility will be selected and the ‘chosen’ facility and will appear differently symbolized. You can also determine which of the train stations has been selected via location-allocation analysis by opening the attribute table for the lines.
By doing the location-allocation analysis, try to answer the following two questions.
Question 5
To which train station is travel time from all bus stations in the Auckland region minimized, as determined by simple location-allocation analysis? (Hint: look at the locations in the Network Analysis window - one will be marked as chosen)
Multi-Facility Location-Allocation
As a final step we want to see which bus stops in the network feed each train station. This would allow us to find the most efficient route if a journey involved a bus leg and a train leg to reach the destination.
- Re-open the properties for the location-allocation layer
- Tick 'Use Hierarchy' as we want to optimise the travel time of our routes
- Head to the 'Advanced Settings' tab. Because we want to allocate all bus stops to all their nearest train station we will increase the 'Facilities to Choose' from 1
- Logically we would choose 50 (the number of train stations), however in our data set 5 of the train stations are too far from the bus stops to be considered in the analysis.
- Choose how many facilities should therefore be chosen, and enter this as the value for 'Facilities to Choose'
- Hit 'Apply' then 'OK', and solve the location-allocation problem.
A warning will appear that informs you of the train stations that cannot be allocated any bus stops. Hit OK to ignore this warning.
Question 6
Taking all the train stations within the Auckland region into consideration, and using the road network hierarchy, how many bus stops are allocated to the Mt Eden Train Station on the basis of minimizing impedance (again, not taking actual bus routes into consideration, just the bus stops)?
To find the number of lines you could count them manually, but there is a quick and easy way to do this.
- Right-click on the 'Lines' sub-heading within the 'Location-Allocation' layer in your Table of Contents.
- Look through the table for Mt Eden station, and look what the 'FacilityID' is.
- Open 'Select by Attributes' either from the button in the Attribute table or from the Selection tab.
- Build a query that will select the lines with the FacilityID you have identified
- "FacilityID" = __
- Hit 'Apply', then check the bottom of the Attribute table, where it willl tell you how many features have been selected.
|
« PREVIOUS TAB |
Advanced Network Analysis
Now that we have learned the basics of network analysis, we can move on to the main assignment part of this lab. We are going to explor how Mt Eden train station serves people around in terms of walking, bus, and cycling. For each part, we are going to assume that someone near Mt Eden is getting the train into Britomart to go to work (those were the days ...).
We have already found the area where people might resonobly walk to Mt Eden train station (Map 1), but what about other modes of transport? We will also look at areas where you could take a 15 minute bus ride to the station, or a 15 minute cycle ride. We will go through the bus catcment process together, then you will tackle the cycle cathcment after.
- Bus Commuting Catchment to the Train Station
Based on some stats, we are going to assume that people ould be willing to take a 15 minute max bus ride to get to the train staion to finish their journey. In addition, the data from Burke & Brown (2007) shows us most people are willing to walk 400 m to their nearest bus stop. Therefore we are going to find areas within 100 m of a bus stop that is served by a route that is 15 mins or less to get to Mt Eden station. Lets get started!
- Using 'Select By Location' find the bus stops within 100 m of Mt Eden station. (Check the 'Buffer' tab of these instructions for help with Select By Location
- Use the 'Identify' tool to inspect these bus stops. You will see one of them isn't a real bus stop, and the other two have a four digit 'stop_code' attribute. Take note of the stop codes.
Next we will do a bit of detective work to find out which bus routes go past these stops.
- Head to the AT live departures tool and type in the stop_code.
- Have a look at the route numbers of the services that run to these stops.
- Hint: you can hit 'Filter routes' to show a list of all the bus routes. We will ignore the 'RBW rail bus'
Next we will find all bus stops along these five routes
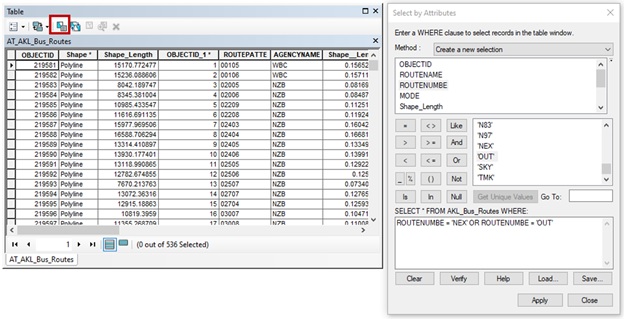
- Head back to ArcMap, and open up the attribute table for the layer named 'AT_AKL_Bus_Routes' (Note: if you are not using the .mxd file provided in the lab data, this layer may be named 'AKL_Bus_Routes').
- Open the 'Select by Attributes' window
- Use the expression builder to build a query that will select your five routes.
- Note in the screenshot the expression will select the NEX and OuterLink routes - yours will be different.
- Each route needs to be separated by the OR operator
- Double-click the buttons to build the query, do not type in attribute names or route name
- Hit 'OK' once you have built you query, and ensure the 5 routes are selected
- Right-click on the bus routes layer in the Table of Contents, head to 'Data', and click 'Export Data'
- Ensure 'Export' is set to 'Selected Features', and save the bus routes as 'mtEden_busRoutes.shp'
- Clear the selection
The bus routes layer shows the centre-line of the bus route. We can assume that most bus stops along this route will be located near this centreline, within 10 metres.
- Use the 'Buffer' tool to create a 10 m buffer around the mtEden_busRoutes layer. Name the output 'mtEden_busBuffer.shp'
- Open the 'Intersect' tool and load in the the AT_AKL_Bus_Stops layer, and mtEden_busBuffer as the two inputs.
- Save the output layer as "mtEden_busStops.shp" and hit 'OK'
The output of this operation is all the bus stops served by the five bus routes that run past Mt Eden train station
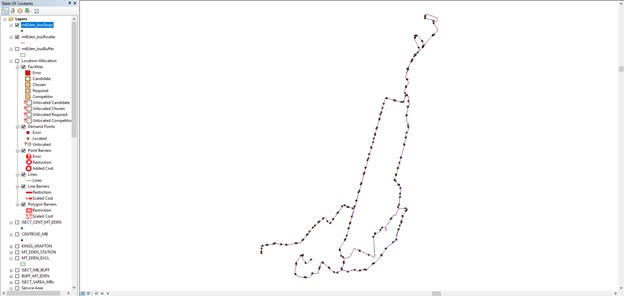
Next, we want to narrow this down to only those stops within 15 minutes drive of Mt Eden station.
- Click the 'Network Analyst' drop down and add a new 'Service Area'
- Load Mt Eden Train Station as the facility
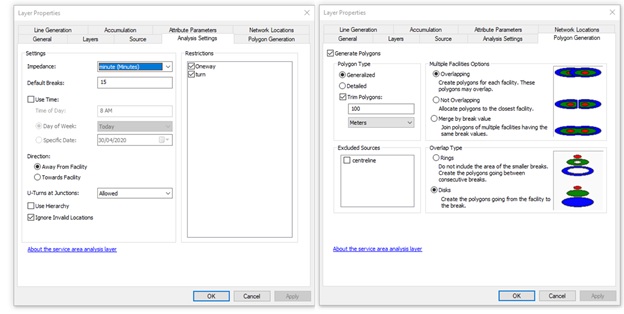
- Right-click on the 'Service Area' heading in the Table of Contents, and click 'Properties'
- On the 'Analysis Settings' tab specify the 'Impedance' as 'Minutes', and the 'Default Breaks' as "15"
- Un-tick 'Use Hierarchy'
- Move to the 'Polygon Generation' tab. Ensure 'Generate Polygons' is ticked, and this is set to 'Generalized'.
- Hit 'OK' to apply the settings, then solve the Service Area problem.
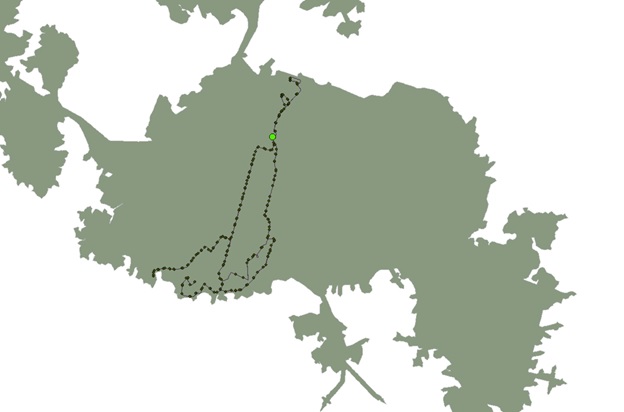
The output is a polygon that shows areas within a 15 minute drive of the train station. This is a suspiciously large area, but that is due to assumptions that there is no traffic, and the vehicle can drive at the speed limit, with no other impeding factors.
- Open up the 'Select By Location' tool. If you need any help with this check the 'Buffer' tab of these instructions.
- Set the 'Target layer' as 'mtEden_busStops', and the 'Source layer' as the polygon of the Service Area you just created.
- Specify the Spatial selection method as 'are completely within the source layer feature'
- Apply the selection, and ensure the bus stops within the 15 minute service area are selected.
- Export the selected bus stops, and save the new layer as "valid_busStops.shp"
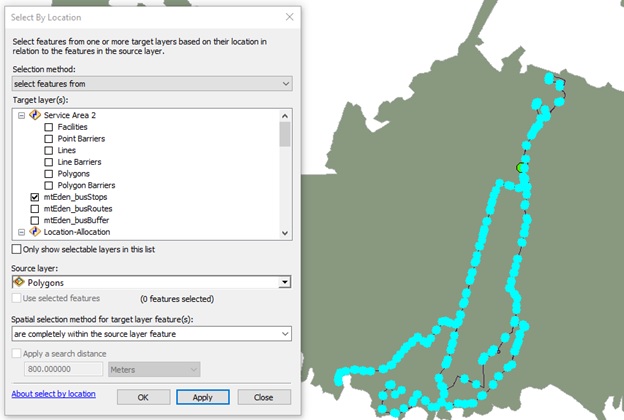
There we have it! All the bus stops within 15 minutes of Mt Eden Station. We know from Burke & Brown (2007) that the median distance people are willing to walk to get to a bus stop is 400 metres
- Add a new 'Service Area' problem to your map.
- Load 'valid_busStops.shp' as the facilities. There should be 825 of them.
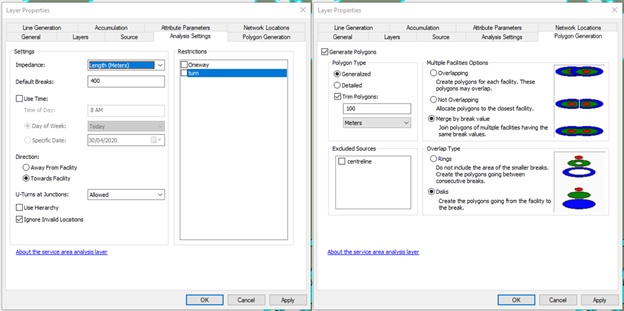
- Open the Service Area properties, and set the 'Impedance' to 'Length', with a 'Default Breaks' value of 400
- Un-tick 'Use Hierarchy', 'Oneway' and 'turn' as these do not apply to pedestrians.
- Move to the 'Polygon Generation' tab. Ensure 'Generate Polygons' is ticked
- Set the 'Multiple Facilities Options' to 'Merge by break value'. This ensures the output service area is one big polygon, not one little one for each bus stop.
- Apply these settings, and solve the problem. The output should be a polygon that stretches out around the bus routes.
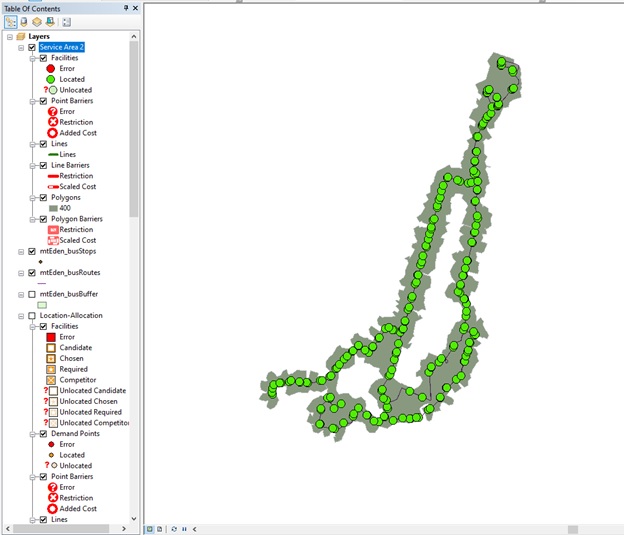
We're nearly there! All that's left is to tidy up the area a little. We are going to assume that anyone who lives within the walking catchment we created earlier will walk to the train station, rather than get the bus, so we will remove this area from our bus catchment.
- First, export the Service Area polygon from the last step as a new shapefile. Name it "mtEden_busCatchement.shp'
- Right-click the 'Polygons' sub-heading under the 'Service Area'. Go to 'Data', then 'Export Data'.
- Ensure you have your walking catchment also saved as its own shapefile.
- Open up the 'Erase' tool, located within 'Analysis Tools', then 'Overlay'
- Select 'mtEden_busCatchment' as the 'Input features'
- Select your walking catchment as the 'Erase features'
- Save the output as "mtEden_busCatchment_erased.shp"
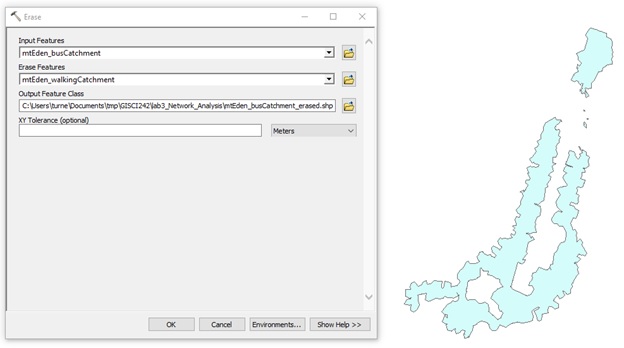
The output is now the areas within a 400 m walk to a bus stop that is within a 15 m ride to Mt Eden station. As we are modelling someone travelling into the central city, the areas to the north of the station do not make sense, as people living here likely would not get a bus to Mt Eden, just to get the train back into the CBD. Therefore, we will tidy our data by removing these areas.
- Right-click on 'mtEden_busCatchment_erased' in the table of contents, hover over 'Edit features' and choose 'Start editing'
- Head to the 'Customize' tab, and hover over 'Toolbars'
- Tick the 'Advanced Editing' toolbar on.
- Using the 'Edit tool' on the 'Editor' toolbar, select the polygon.
- On the 'Advanced Editing' toolbar, hit the 'Explode Multipart Feature' button.
Note: if the button for 'Explode Multipart Feature' is greyed out, try clicking 'Stop Editing', save the document then try edit the layer again.
- Now just select the areas to the north of the train station, and hit the 'Delete' key on your keyboard to delete these areas.
- Once you are happy, hit the 'Editor' dropdown on the 'Editor' toolbar, then 'Save edits' then 'Stop editing' to save your changes
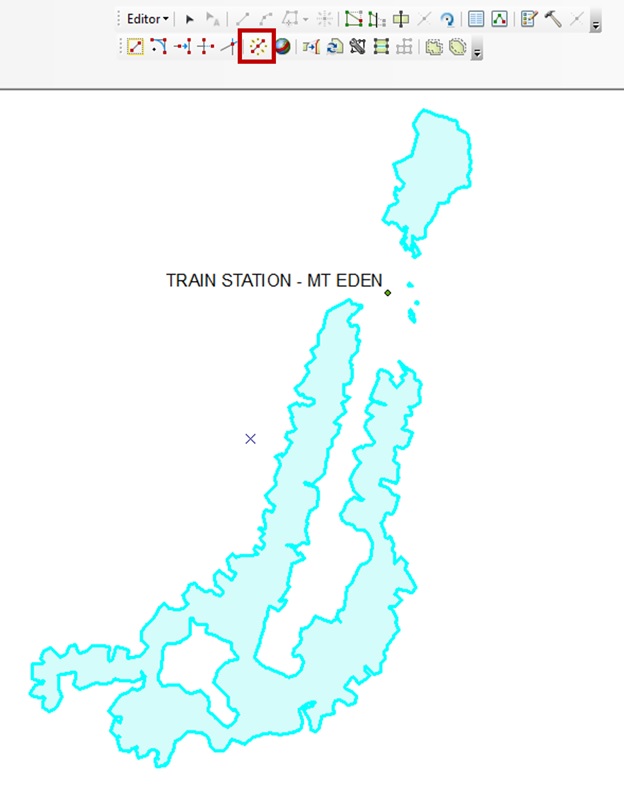
There we have it! We have now found areas that are served by a 400 m walk to a bus stop that is a 15 min ride to Mt Eden station, excluding areas within the walking catchment, and areas already close to the central city. This layer will form the basis of your Map 2, but make sure to provide context to the layer (e.g. the train stations, relevant bus routes and stops). Remember the key point of a map, it should tell us where the bus areas are, and show why they are here. Remember to keep the map tidy and not too cluttered.
As part of the write up for the maps we want to know the total number of people served by Mt Eden station, between walking, bus and cycling. It makes sense to find the bus number now, by using either Intersect or Select By Location on the centroids layer, and the final bus catchment.
Map 2
Map 2 should show the bus commuter catchment to Mt Eden train station. You should also include the relevant bus routes, bus stops etc. Mt Eden station should be shown prominently. Add the meshblocks, symbolised by population density.
Head to the symbology tab, and have a look at all the different point symbols available (try search for "train").
Include some write-up that mentions the following:
- The bus stop_codes for the two initial bus stops you identified
- The route numbers of the five bus routes used in the analysis
- The percentage of the 2013 Auckland population served by bus outside of walking distance to Mt Eden Train Station.
- Any other relevant information or decisions that you made.
The final task is to find areas within a 15 minute bike ride to Mt Eden station, using a few key assumptions. There arent any instructions for this section, instead using the skills and tools you have learned in the last section, and the below key criteria you should be able to derive the cycling catchment.
Make sure you write down the steps you took as you go, as this will be part of the writeup, and also helps if you need to go back and figure out what you have done earlier!
- Cycle Commuting Catchment to the Train Station
Finally we will find the area that people may cycle to Mt. Eden Station to catch a train, using a few assumptions.
- Lets assume that people that live within a 15 minute bike ride of Mt. Eden Station are willing to bike there, as long as for at least part of that distance they can reasonably expect to cycle along a bike path or in a designated bike lane (visual inspection of the 'AKL_Cycle_Network' layer will help you here).
- Accounting for hills and traffic, let's assume a very leisurely Auckland commuting cycle speed of 12 km/hr. If cycling commuters are considered alone (i.e., cyclists within a 15 minute bicycle commute of the Mt Eden train station), how many potential cyclists (number of individuals not already within walking distance of the two competing train stations, Kingsland or Grafton, but still potentially within the walking catchment of Mt. Eden) are served by cycle access?
- Remember, they must have an expectation that they can reasonably cycle along a dedicated bike path for at least part of the distance (and a reasonable distance, not just hopping on for 100 or so metres and then hopping off).
- In this instance it doesn’t make sense to use centroids but rather the whole meshblock polygon to find the population, as we have already assumed an leisurely cycling pace, and people may be willing to cycle a few hundred metres more if it will get them to or from a bus stop along a route that services a train station. You define what constitutes ‘reasonableness’ in this scenario, and include this in your writeup.
- Hint: Having a look where bike paths exist and where they connect to will be useful when selecting areas within the bicycle-commutable service area of the Mt Eden train station.
- Hint #2: you can manually remove selected features from a selection set by going to the 'Selection' tab, then 'Interactive Selection Method' and choose 'Remove From Current Selection'.
The entire process can be generalized as follow steps:
- Do some simple maths to find the reasonable cycling distance (12 kh/h for 15 minutes);
- Create service areas for the three train stations by using this distance (Service area) - Polygon;
- Identify the bike commuting area for Mt Eden (Erase) - Polygon;
- Find your “reasonable” bike path, and trim off any areas that are not serviced by the bike path network (e.g. look to the north) – Polygon + Polyline.
Map 3
Map 3 should include the service area and the reasonable bike paths, along with any other layers that add context. Again, add the meshblocks symbolised by population density, and Mt Eden Station.
- Make sure that along with the map, you describe how you determined ‘reasonableness’ of cycling along a dedicated cycle path/bike line. For example, were any parts of the service area solution excluded?
- Using centroid containment, and suspending the ‘reasonableness’ criterion for cyclists, what is your estimate of the total % of the Auckland population that is served by the Mt Eden train station (cyclists, walkers, and bus commuters combined)?
- Include some writeup text along with the map to assist in map interpretation and summarize results of your analysis. This should also contain an indication of the total % of the Auckland population that is served by the Mt Eden train station (cyclists, walkers, and bus commuters combined). Here, you can suspend the ‘reasonableness’ criterion for cycling if you so choose, and use centroid containment when arriving at your estimate.
- A cartography tip that may prove useful for this assignment: you can make layers (semi-)transparent by controlling the transparency under the Layer Properties > Display.
When it comes to finding the total population that is served by Mt Eden Train Station by walking, bus and cycling, you could just simply add the three percentages you have found for each of those catchments together to give a rough estimate of the population.
A more statistically sound method that removes overlap between the three catchments is to merge them together and use this to find the population. The necessary steps are summarized below:
- Run the 'Merge' tool to combine the three catchments into one shapefile
- Run the 'Dissolve' tool to combine them all into one single polygon
- Use this polygon to Intersect/Spatial Join/Select By Location the meshblocks to find the population
- You would need to make a decision here whether you are going to use centroids or the areal meshblocks here - make sure to detail your choice and justify it in the write-up.
The Editor Toolbar
You can make heads-up (interactive/on-screen) changes to spatial geometry. For example, you can split polygons and delete portions of areas (or split lines, delete points, etc.). This may come in useful when working with the ‘reasonableness’ criterion for cycle commuting in your analysis (you may want to delete parts of this service area polygon). This is done using editing tools.
On the Main Menu, go to Customize > Toolbars > Editor. This will bring up the Editor toolbar:

To make edits to a layer, on the toolbar, click on Editor with the dropdown arrow highlighted above.
- Select Start Editing and then choose the layer to which you want to make edits. The other tools on the toolbar will become activated.
- Select the feature (object) you want to edit, and select the Cut polygons tool. This will split (or cut) polygons along the line you draw heads-up on-screen in the Data View. You can insert multiple vertices (it doesn’t need to be a single straight line), double-clicking when you’ve inserted the last one (end of the line).
- You can then select any polygons you want to delete using the Editor Selection tool, and simply use the delete key on the keyboard to delete them.
- You need to save your edits. To do this, click on the Editor dropdown again, and click Save Edits and then Stop Editing.
Note: If the 'Cut Polygons Tool' is greyed out, or gives an error message when clicked, click 'Stop Editing', save the ArcMap document, and start editing again.
|
« PREVIOUS TAB |
Tips & Tricks
Map 1
Map 1 does not require a write-up - the assginment template asks for a description, just ignore this.
Default Geodatabase issues (if working with FlexIT)
The initial Default Geodatabase can become corrupted (the "Unable to create or open Default Geodatabase" error. ArcGIS unavoidably always want to create/use this when starting up), so the following would need to be done:
- Exit from ArcMap and ArcCatalog in FlexIT
- Open 7-Zip in FlexIT (you could also use the Adobe Desktop)
- Browse to Computer, then H: then the ArcGIS folder
- Delete all the gdb files
- Exit from 7 Zip
- Go into ArcCatalog and follow the URL above
Buttons on the Editor toolbar are greyed out
Try clicking the 'Editor' toolbar, 'Stop editing', saving the ArcMap document and trying to edit again.
Some tools are failing, saying they 'cannot access the data'
- Go to the 'Geoprocessing' tab and open 'Geoprocessing Options'
- Un-tick the box 'Enabled' under 'Background geoprocessing'
This forces ArcMap to process in the foreground (you will see a progress bar while it is working) which often fixes data compatibility issues. This can get annoying, so you can turn background processing back on once the failing tool has worked.
Launching ArcMap & H: Drive Acess
There has been some issues, but they should be resolved now. Read the instructions on the 'Getting Started' tab first - these should prevent any errors.
Your Submission Checklist
- Your answers to questions 1-6
- Map 1: the walking catchment for Mt. Eden Station
- Map 2: the bus commuter catchment for Mt. Eden Station
- Map 3: the cycling catchment for Mt. Eden Station
- Some accompanying text that includes
- the names of the bus routes you used in the bus catchment analysis
- the percentage of Auckland's population served by a 15 minute bus ride to Mt. Eden Station (excluding those within the walking catchment of any train station)
- how you determined ‘reasonableness’ of cycling along a dedicated cycle path/bike line. For example, were any parts of the service area solution excluded?
- the percentage of Auckland's population served by a 15 minute bicycle ride to Mt. Eden Station (including those within walking distance of Mt.Eden Station, but excluding those within the walking catchment of Kingsland and Grafton Stations)
- an indication of the total % of the Auckland population that is served by the Mt Eden train station (by walking, cycling and bus).
Resources
- 24 x 7 Availability.
- Trained and Certified Experts.
- Deadline Guaranteed.
- Plagiarism Free.
- Privacy Guaranteed.
- Free download.
- Online help for all project.
- Homework Help Services

